In automobiles, countless intricate components work harmoniously to ensure that our vehicles transport us safely and smoothly from one destination to another. Constant Velocity (CV) joints are among these crucial parts, often operating quietly and efficiently beneath the surface. However, when CV joints falter, they can become a source of mysterious noises, discomforting vibrations, and potentially expensive repairs.
In this comprehensive guide, we journeyed to unravel the mysteries surrounding CV joints, shedding light on their purpose, the symptoms that indicate their wear and tear, the costs associated with their replacement, and valuable maintenance insights. Whether you’re an avid DIY mechanic or a vehicle owner seeking to understand your car’s inner workings, this article will equip you with the knowledge to navigate the world of CV joints confidently.
So, fasten your seatbelt and get ready to explore CV joints in-depth, from their fundamental function to practical tips for keeping them in optimal condition. Whether you’re faced with strange noises when driving straight or contemplating the costs of CV joint replacement, this guide has you covered. Let’s begin our journey into the world of CV joints and demystify the complexities that lie beneath your vehicle’s surface.
Understanding CV Joints

What is a CV Joint and How Does it Work?
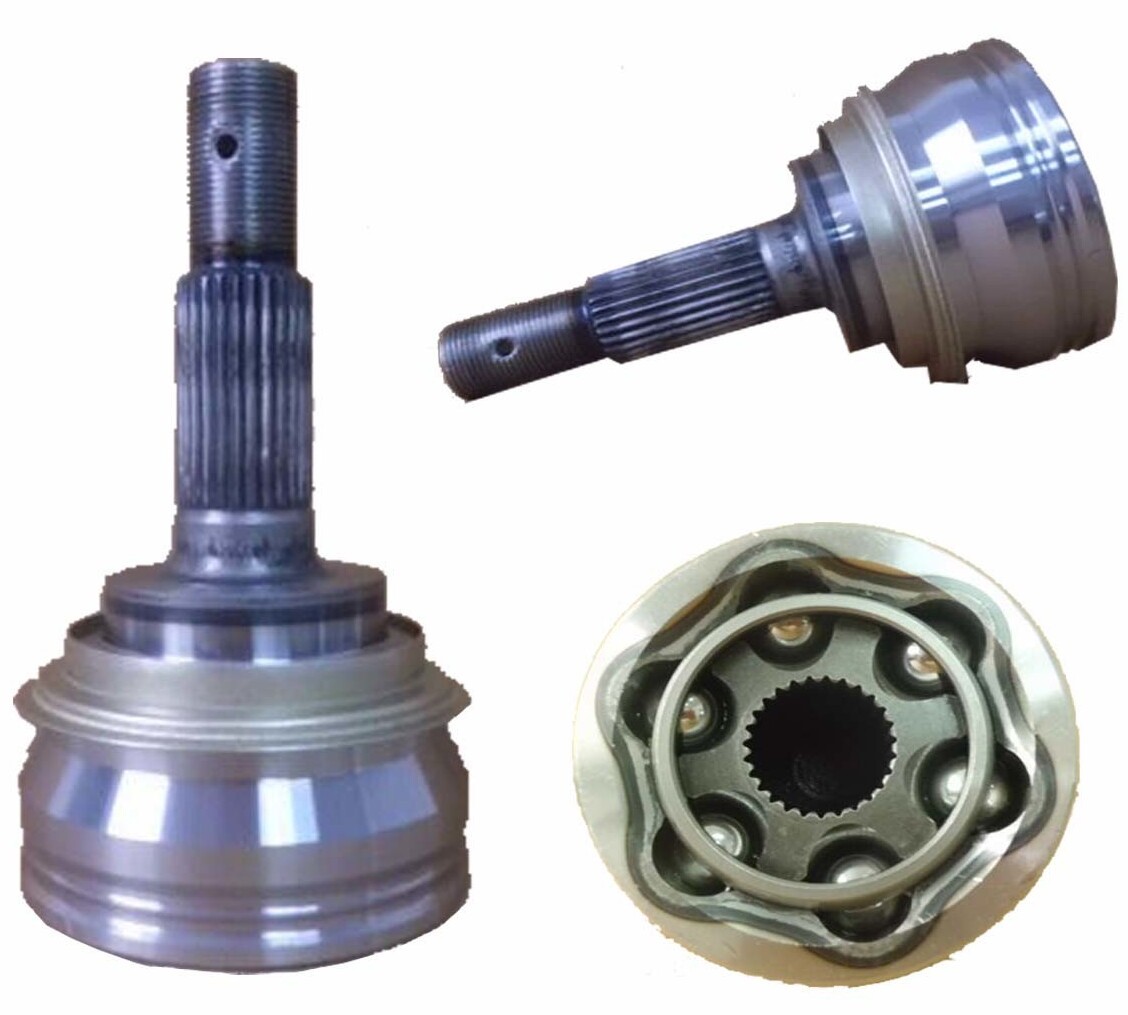
To comprehend the significance of CV joints, it’s essential to grasp their fundamental role in the mechanical symphony of your vehicle. Constant Velocity (CV) joints are integral to your car’s drivetrain, connecting the transmission to the wheels. They play a pivotal role in transmitting power from the engine to the wheels while accommodating the variations in suspension movement and steering angles. CV joints allow for a smooth and consistent transfer of rotational force, enabling your vehicle to navigate turns and uneven terrain easily.
CV joints achieve this remarkable feat through a design that permits a constant velocity output, hence their name. They consist of an inner and an outer joint, enclosed in a protective CV joint boot filled with grease. The inner joint connects to the transmission, while the outer joint links to the wheel hub. This configuration allows for flexibility and rotation, ensuring your wheels can turn while maintaining a consistent power transfer.
Also, check out this related post: Radiator Hoses: All You Need To Know!
Differentiating CV Joints from U Joints
While both CV joints and U joints serve a similar purpose of transmitting power within a vehicle’s drivetrain, they differ significantly in design and functionality. Understanding these differences is crucial for diagnosing issues and selecting the appropriate repairs.
U joints, short for Universal joints, are typically found in rear-wheel-drive and some four-wheel-drive vehicles. They consist of two yokes connected by a cross-shaped pivot, allowing for rotational movement in multiple directions. U joints are robust and reliable for their intended purpose. Still, they are less suitable for applications that require constant and significant angle changes, such as those found in front-wheel-drive vehicles.
CV joints, on the other hand, excel in front-wheel-drive and all-wheel-drive setups and many modern vehicles due to their ability to accommodate variable angles and constant velocity output. Unlike U joints, CV joints are encased in protective boots filled with lubricating grease, reducing the likelihood of contamination and wear.
Signs of Trouble With CV Joint

Common Symptoms of a Bad CV Joint
Detecting a failing CV joint early can save you from expensive repairs and potentially dangerous situations on the road. Fortunately, CV joints tend to exhibit specific symptoms when they are in distress. Here are some common signs that may indicate a problem with your CV joint:
-
Clicking or Popping Noises
One of the most recognizable signs of a bad CV joint is a clicking or popping sound when you make sharp turns. This noise is often most noticeable during low-speed maneuvers, like parking or navigating tight corners.
-
Vibrations
A damaged CV joint can cause vibrations in the vehicle, especially during acceleration. These vibrations may be felt through the steering wheel or the entire car and can intensify as the problem worsens.
-
Grease Leakage
If you notice grease splattered around the inside of your wheel, it could be a sign that the CV joint boot has cracked or torn, allowing grease to escape. This is a serious issue that requires immediate attention.
-
Shaking During Acceleration
When accelerating, a failing CV joint can lead to a shaking or shuddering sensation in the front of the vehicle. This shaking may be more pronounced when turning.
-
Difficulty Steering
A CV joint in poor condition may make your steering feel heavy or less responsive, particularly when navigating curves.
-
Visible Wear or Damage
During a visual inspection, you may notice visible damage to the CV joint boot, such as cracks, tears, or leaks. Additionally, if the CV joint is visibly damaged or has excessive play, it should be addressed promptly.
Can a Bad CV Joint Affect the Transmission?
While CV joint issues primarily affect the drivability and handling of your vehicle, severe neglect or continued operation with a damaged CV joint can have broader consequences, potentially impacting the transmission. Here’s how:
-
Transmission Damage
Excessive vibrations and uneven power transfer can strain the transmission components in extreme cases where a damaged CV joint is left unattended. Over time, this can lead to transmission damage, resulting in costly repairs or replacements.
-
Loss of Power
A severely damaged CV joint may fail, causing the affected wheel to lose power. This can affect your vehicle’s ability to move and sometimes result in a complete breakdown.
Recognizing CV Joint Noise and Clicking
CV joint noise is often an early indicator of trouble. When you hear clicking or popping sounds while turning, addressing the issue promptly is essential. The noise is typically caused by worn or damaged CV joint bearings, which can no longer maintain a consistent velocity during rotation.
These noises may vary in intensity, becoming more pronounced as the problem worsens. Remember that addressing CV joint issues early can prevent further damage and ensure your vehicle’s safe operation.
Diagnosis and Inspection Of CV Joint

How to Tell if Your Front CV Joint is Bad
Diagnosing a faulty front CV joint is essential for maintaining the safety and performance of your vehicle. Here are some methods to help you determine if your front CV joint may be experiencing issues:
- Listen for Noises
As mentioned earlier, the most common symptom of a failing front CV joint is a clicking or popping sound when making sharp turns, particularly when parking or navigating tight corners. Pay close attention to these noises, as they can indicate a problem with the CV joint.
- Feel for Vibrations
If you experience vibrations through the steering wheel or the vehicle itself, especially during acceleration or turns, it’s a sign that the front CV joint may be compromised. These vibrations can become more pronounced as the problem worsens.
- Inspect the CV Joint Boot
Perform a visual inspection of the CV joint boots. Look for cracks, tears, or grease leakage. A damaged boot can lead to contamination of the CV joint and, eventually, its failure.
- Check for Play
Suppose you have the necessary tools and experience. In that case, you can check for excessive play in the front CV joint by carefully lifting the vehicle, securing it on jack stands, and gently attempting to move the axle. Any noticeable movement or play indicates a problem with the joint.
Identifying Inner CV Joint Failure Symptoms
The inner CV joint, while less exposed to external elements than the outer joint, can still experience problems. Recognizing inner CV joint failure symptoms is crucial to address issues promptly. Some symptoms to watch for include:
- Vibrations during Acceleration
A failing inner CV joint can lead to vibrations during acceleration, often felt throughout the vehicle. These vibrations can become more noticeable as you apply more throttle.
- Odd Noises
While the distinctive clicking or popping sounds associated with outer CV joints are less common with inner joints, you may hear clunking or grinding noises when an inner CV joint is compromised.
- Steering Difficulties
Like outer CV joints, inner joints can affect your vehicle’s handling. If you notice difficulty steering or a change in steering response, an inner CV joint issue could be the culprit.
Using a CV Joint Puller for Diagnosis
A CV joint puller can be valuable when you suspect a CV joint issue but want a more definitive diagnosis. Here’s how to use it for diagnosis:
- Lift the Vehicle
Safely lift the vehicle using jack stands and secure it to ensure it won’t move during inspection.
- Remove the Affected Wheel
Access the CV joint by removing the wheel associated with the joint you suspect is problematic.
- Inspect the CV Joint
With the wheel removed, you can visually inspect the CV joint. Look for visible signs of damage, such as cracks, excessive play, or loose components.
- Use the CV Joint Puller
A CV joint puller is a specialized tool designed to separate the CV joint from the axle shaft. Follow the manufacturer’s instructions to attach the puller and gently remove the CV joint.
Using a CV joint puller, you can directly assess the condition of the joint and confirm whether it needs replacement or repair. Remember that if you’re unsure about performing these inspections and repairs, it’s always best to consult a qualified mechanic or technician to ensure your vehicle’s safety and reliability.
Maintenance and Repair Of A CV Joint

CV Joint Grease: Its Importance and Application
CV joint grease, often referred to as CV joint lubricant or moly grease, plays a critical role in the longevity and performance of your CV joints. Here, we delve into the significance of CV joint grease and how to apply it effectively:
Importance of CV Joint Grease
- Friction Reduction
CV joint grease reduces friction between the joint’s moving parts, preventing premature wear and tear.
- Heat Dissipation
It aids heat dissipation, ensuring the CV joint operates at the right temperature.
- Sealing and Contamination Prevention
Grease-filled CV joint boots create a barrier that removes dirt, debris, and moisture, safeguarding the joint from contamination.
- Noise Reduction
Properly lubricated CV joints operate quietly and smoothly, minimizing noise and vibrations.
Application of CV Joint Grease
- Inspect the Boot
Check the CV joint boot for any damage or leaks. If the boot is compromised, it must be replaced before applying grease.
- Clean the Joint
Ensure the CV joint is free from dirt, old grease, and debris. Use a suitable solvent to clean the joint thoroughly.
- Apply Grease
Using a grease gun and the appropriate nozzle, inject fresh CV joint grease into the joint until it oozes out from the boot’s seams. This ensures the joint is adequately lubricated.
- Boot Reinstallation
If you’ve removed the CV joint boot during the process, carefully reinstall it, ensuring it’s securely fastened to prevent contamination.
Regular maintenance involving applying CV joint grease can significantly extend your CV joints’ life and prevent costly repairs or replacements.
Here is another comprehensive guide to check: Radiator Support Bracket
Cost Analysis: CV Joint Repair vs. Replacement
When facing CV joint issues, you’ll often need to decide whether to repair or replace the joint. Here’s a cost analysis to help you make an informed decision:
CV Joint Repair
- Cost-Effective: Repairing a CV joint is generally more cost-effective than replacing the entire assembly.
- Labor Costs: Labor costs for a repair are usually lower, mainly if you or a knowledgeable mechanic can perform the repair.
- Parts Replacement: In a repair, only the damaged components are replaced, reducing parts costs.
- Applicability: Repair is suitable for cases where the CV joint damage is limited and hasn’t caused significant wear to other components.
CV Joint Replacement
- Comprehensive Solution: Replacing the CV joint assembly provides a comprehensive solution, addressing potential hidden damage or wear.
- New Components: All components, including the joint, boot, and associated hardware, are brand new, potentially providing longer-term reliability.
- Labor Costs: While the parts cost more, labor costs can be higher due to the more involved replacement process.
- Applicability: Replacement is often chosen for severely damaged CV joints or when other drivetrain components have suffered damage.
Ultimately, the decision between repair and replacement depends on the severity of the CV joint’s condition, your budget, and whether you’re comfortable with DIY repairs. Consulting with a qualified mechanic can provide valuable guidance in making the right choice.
CV Joint Boot Replacement: When and Why
CV joint boots play a critical role in protecting the delicate inner workings of your CV joints by sealing them from dirt, moisture, and debris. Over time, however, these protective boots can deteriorate due to various factors, including wear and tear, extreme temperatures, and exposure to road contaminants. Knowing when and why to replace CV joint boots is crucial to prevent costly damage to the CV joints themselves. Here’s what you need to know:
When to Replace CV Joint Boots
- Visible Damage: The most obvious sign that your CV joint boot needs replacement is visible damage. Cracks, tears, or holes in the boot are indications that it can no longer effectively shield the CV joint from contaminants.
- Grease Leakage: If you notice grease splatters around the wheel or axle area, it’s a clear sign of a CV joint boot breach. Grease leakage is critical as it exposes the CV joint to contaminants and accelerates wear.
- CV Joint Noise: While noise is often associated with the CV joint, a damaged boot can contribute to the problem. If you hear clicking or popping sounds, especially during turns, it’s essential to inspect the boots for any issues.
Why Replace CV Joint Boots
- Protect CV Joint Integrity: The primary purpose of CV joint boots is to protect the CV joint from contamination. When the boots fail, dirt, moisture, and debris can enter the joint, leading to premature wear and eventual failure of the CV joint.
- Prevent Costly Repairs: Replacing CV joint boots is significantly more affordable than replacing the entire CV joint assembly. By addressing boot issues promptly, you can avoid the more substantial expense of CV joint replacement.
- Maintain Drivability: Damaged CV joint boots can compromise the performance and handling of your vehicle, leading to vibrations, steering difficulties, and safety concerns. Replacing the boots ensures your vehicle remains drivable and safe.
- Extend CV Joint Lifespan: Well-maintained CV joint boots can help extend the lifespan of your CV joints, saving you money in the long run by postponing the need for CV joint replacement.
Replacement Costs
CV Joint Replacement Cost: Factors and Estimations
The cost of replacing a CV joint can vary significantly depending on several factors. Understanding these factors and estimating the expenses is crucial for budgeting and making informed decisions. Here’s what you need to consider:
- Vehicle Make and Model
Your vehicle type can substantially impact the cost of CV joint replacement. High-end or luxury vehicles may have more expensive replacement parts.
- CV Joint Type
The specific type of CV joint in your vehicle can affect the cost. Some vehicles use more complex CV joint designs, which can be pricier to replace.
- Labor Costs
Labor charges for CV joint replacement can vary from one mechanic or auto shop to another. Labor rates often depend on location, shop reputation, and the job’s complexity.
- Quality of Replacement Parts
The quality of the replacement CV joint and related components can influence the cost. OEM (Original Equipment Manufacturer) parts are more expensive than aftermarket alternatives, but they may offer better quality and longevity.
- Front or Rear CV Joint
Front CV joint replacement is typically more common and may be less expensive than replacing a rear CV joint.
- Additional Repairs
CV joint issues can damage other components, such as the transmission or wheel bearings. If additional repairs are needed, they will add to the overall cost.
- DIY vs. Professional
Replacing the CV joint yourself can save labor costs but requires the necessary tools and expertise. However, if not done correctly, it can lead to further complications and expenses.
Transmission Problems after CV Joint Replacement: Causes and Solutions
Occasionally, after replacing a CV joint, you may encounter transmission-related issues. While CV joint replacement should not directly impact the transmission, there are situations where problems can arise. Here are some potential causes and solutions:
- Improper Installation
If the CV joint replacement is not performed correctly, it could lead to misalignment or damage to other components, including those connected to the transmission. Ensure that a qualified technician does the replacement.
- Additional Stress
If the CV joint was severely damaged before replacement, it might have put additional stress on the transmission. In such cases, addressing any underlying transmission issues promptly is essential.
- Fluid Leaks
While rare, a CV joint replacement may inadvertently cause transmission fluid leaks if not sealed properly. If you notice any fluid leakage, it should be addressed immediately to prevent damage to the transmission.
- Electronic Sensors
Some modern vehicles have sensors that monitor wheel speed and transmission performance. These sensors may need recalibration or replacement if they are disturbed during the CV joint replacement process.
If you experience transmission problems after a CV joint replacement, it’s crucial to consult a qualified mechanic to diagnose and resolve the issue promptly. Timely action can prevent further damage to your transmission and ensure the continued smooth operation of your vehicle.
DIY vs. Professional Repair

Can You Replace a CV Joint Yourself?
Replacing a CV joint can be challenging and labor-intensive, making it suitable for experienced DIY mechanics with the necessary tools, equipment, and automotive knowledge. However, whether you should attempt a DIY CV joint replacement depends on several factors:
Factors to Consider for DIY CV Joint Replacement
- Mechanical Experience
Assess your level of mechanical expertise. Have you successfully performed similar automotive repairs, such as brake replacements or suspension work? CV joint replacement requires a moderate to advanced skill level.
- Tools and Equipment
Do you have access to the required tools and equipment, including a vehicle lift or jack stands, a CV joint puller, a torque wrench, and a comprehensive set of hand tools? Proper tools are crucial for a successful CV joint replacement.
- Service Manual
Consult your vehicle’s service manual or a reputable repair guide. These resources provide instructions for CV joint replacement specific to your make and model.
- Safety
Ensure you have a safe workspace and follow all safety precautions. Working on a vehicle can be hazardous, and proper safety measures are non-negotiable.
- Time and Patience
CV joint replacement can be time-consuming, especially for first-time DIYers. Be prepared to invest several hours into the project.
Finding CV Joint Repair Services Near You

Suppose you decide a DIY CV joint replacement is beyond your capabilities or prefer a professional to handle the task. In that case, finding a reputable CV joint repair service near you is essential. Here’s how to go about it:
- Ask for Recommendations
Seek recommendations from friends, family, or coworkers who have had positive experiences with auto repair shops or mechanics in your area.
- Online Reviews
Use online resources like review websites or forums to research local auto repair shops and read customer reviews. This can provide valuable insights into the quality of their services.
- Check Certifications
Verify that the mechanics at the repair shop are certified and have the necessary expertise to perform CV joint repairs. Look for ASE (Automotive Service Excellence) certification.
- Get Multiple Quotes
Contact several repair shops for CV joint replacement quotes. This will help you compare prices and services to make an informed decision.
- Warranty
Inquire about warranties or guarantees on the parts and labor involved in CV joint replacement. A reputable shop should stand behind their work.
- Visit the Shop
If possible, visit the repair shop to assess its cleanliness, organization, and professionalism. This can give you a sense of their commitment to quality service.
Remember that CV joint replacement is a critical automotive repair that impacts the safety and drivability of your vehicle. Whether you perform it yourself or entrust it to a professional, prioritizing quality and safety is paramount.
Differentiating CV Joint Issues from Wheel Bearing Problems
How to Tell the Difference Between a Bad Wheel Bearing and a Bad CV Joint
Detecting whether you have a bad wheel bearing or CV joint is crucial because both issues can exhibit similar symptoms. Here’s how to distinguish between them:
Symptoms of a Bad Wheel Bearing:
- Noise Dependent on Speed
Wheel bearing noise tends to be directly related to vehicle speed. As you accelerate, the noise may become louder. Conversely, it may diminish when you slow down or coast.
- Change in Noise when Turning
When you turn the steering wheel while driving, the noise from a bad wheel bearing may change. If you’re turning right and the noise gets louder, it often indicates an issue with the left wheel bearing (and vice versa).
- Consistency
Wheel bearing noise is generally constant, whether driving straight or making turns.
- Vibration
A failing wheel bearing can sometimes lead to vibrations in the vehicle, particularly at higher speeds.
Symptoms of a Bad CV Joint:
- Noise Dependent on Turning
CV joint noise is often more pronounced during turns, exceptionally sharp ones. You may hear clicking or popping sounds when maneuvering.
- Influence of Steering Angle
The noise from a bad CV joint can vary with the angle of the steering wheel. It may increase or decrease as you turn the wheel.
- Consistency
CV joint noise may be less noticeable or absent when driving straight without making turns.
What Does a Bad CV Joint Sound Like?
A bad CV joint can produce several distinctive sounds, which may vary in intensity depending on the severity of the issue. Here’s what a bad CV joint can sound like:
- Clicking or Popping
The most common sound associated with a failing CV joint is a clicking or popping, especially when turning. This noise is often more pronounced during sharp turns, such as parking.
- Clunking
A damaged CV joint can sometimes produce a clunking or thudding sound, particularly during acceleration or when shifting between drive and reverse.
- Humming or Whirring
A damaged CV joint can also generate a humming or whirring sound, especially at higher speeds. Vibrations in the vehicle may accompany this.
- Metallic Grinding
You may hear a metallic grinding noise in the advanced stages of CV joint failure. This is a severe issue and requires immediate attention.
Understanding these differences in symptoms and sounds is essential for diagnosing and addressing the specific issue affecting your vehicle. If you’re uncertain about the source of the problem, it’s advisable to consult a qualified mechanic who can perform a thorough inspection and provide an accurate diagnosis. Prompt attention to these issues can prevent further damage and ensure the safety and performance of your vehicle.
FAQs about CV joint
Can you drive with a bad CV joint?
It’s not advisable to drive with a bad CV joint. A damaged CV joint can lead to serious safety and mechanical issues, potentially causing loss of control and further damage to your vehicle.
What do CV joints do?
CV joints, or Constant Velocity joints, are critical components of your vehicle’s drivetrain. They transmit power from the transmission to the wheels while allowing for flexible movement and steering, ensuring a smooth and consistent transfer of rotational force.
What happens when a CV joint fails?
When a CV joint fails, it can result in various symptoms, including clicking or popping noises during turns, vibrations, difficulty steering, and, if left unaddressed, potential damage to the transmission or wheel bearings.
How do you tell which CV joint is bad?
You can listen for noises when making turns to determine which CV joint is faulty. If the noise is more pronounced when turning left, it’s likely the right CV joint, and vice versa. Visual inspection for damaged CV joint boots and checking for play during a vehicle lift can also help pinpoint the issue.
Can a bad CV joint affect the transmission?
Yes, a bad CV joint can indirectly affect the transmission. Excessive vibrations and strain from a damaged CV joint can lead to transmission issues if the problem is not addressed promptly.
What is the difference between inner and outer CV joints?
Inner CV joints connect to the transmission, while outer CV joints link to the wheel hub. Both types of joints are crucial for maintaining power transfer and flexibility in the drivetrain.
What are the symptoms of a bad inner CV joint?
Symptoms of a bad inner CV joint may include vibrations during acceleration, odd noises, and steering difficulties. These symptoms can overlap with those of a failing outer CV joint.
How much does it cost to replace a CV joint?
The cost of replacing a CV joint can vary depending on factors like the type of vehicle, labor costs, and the quality of replacement parts. It can range from a few hundred dollars to over a thousand dollars.
Do warranties cover CV joint repairs?
It depends on the repair shop and the parts used. Some repair shops may offer a warranty on parts and labor for CV joint replacement. Always inquire about warranty coverage before proceeding with the repair.
Can a CV joint be repaired, or must it be replaced?
In most cases, a damaged CV joint should be replaced rather than repaired. Repairs may not provide a reliable long-term solution, and replacing the joint is generally more cost-effective.
Is it safe to drive with a damaged CV joint temporarily?
Driving with a damaged CV joint for an extended period is not safe. While you may be able to drive short distances in an emergency, it’s essential to address the issue promptly to prevent further damage and potential safety hazards.
Conclusion
In the world of cars, CV joints are essential. This guide has helped you understand what they are, how to spot problems, and what to do when things go wrong. You’ve learned to distinguish between CV joint and wheel bearing issues, recognize the signs of a bad CV joint, and even figure out which one might be causing trouble.
Knowing whether you’re into DIY car fixes or prefer professional help lets you make intelligent decisions about fixing your CV joints. Quick attention to these issues keeps your car reliable and you safe on the road. So, remember these lessons to keep your vehicle in good shape. It’s an investment that pays off in a smooth ride and peace of mind.