Resetting the fuel gauge by disconnecting and reconnecting the battery is a potential solution for rectifying inaccuracies or malfunctions.
This method often extends to resetting various electronic components within your vehicle. Before initiating this process, ensure the vehicle is powered off and the ignition key is removed.
However, if resetting the fuel gauge proves ineffective, replacement might be necessary. Typically, this task demands the expertise of a seasoned mechanic, potentially incurring a substantial cost, especially if the fuel gauge is an integral part of the car’s primary electronic system.
This article delves into the efficacy of resetting the fuel gauge by battery disconnection, addressing the possibilities and solutions. Stay tuned until the conclusion for the answers you seek.
What is a fuel gauge?
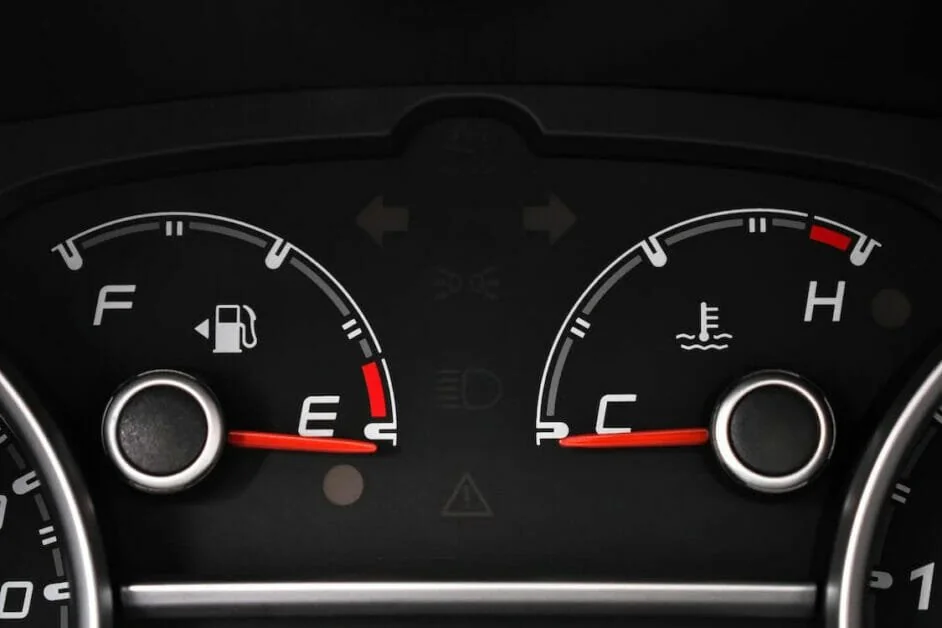
A fuel gauge is an essential component in a vehicle that measures and displays the amount of fuel present in the gas tank. It provides drivers with an indication of the remaining fuel level, allowing them to monitor when a refill is necessary. The gauge typically displays this information via a needle on the dashboard, indicating the fuel level as full, halfway, or low. This information is vital for ensuring the driver does not run out of fuel during their journey.
Fuel gauges work in tandem with sensors and a complex system to estimate and display the quantity of fuel in the tank accurately. This information is relayed to the driver, usually through a visual display on the dashboard, to assist in making informed decisions about refueling.
What sensor controls the fuel gauge?
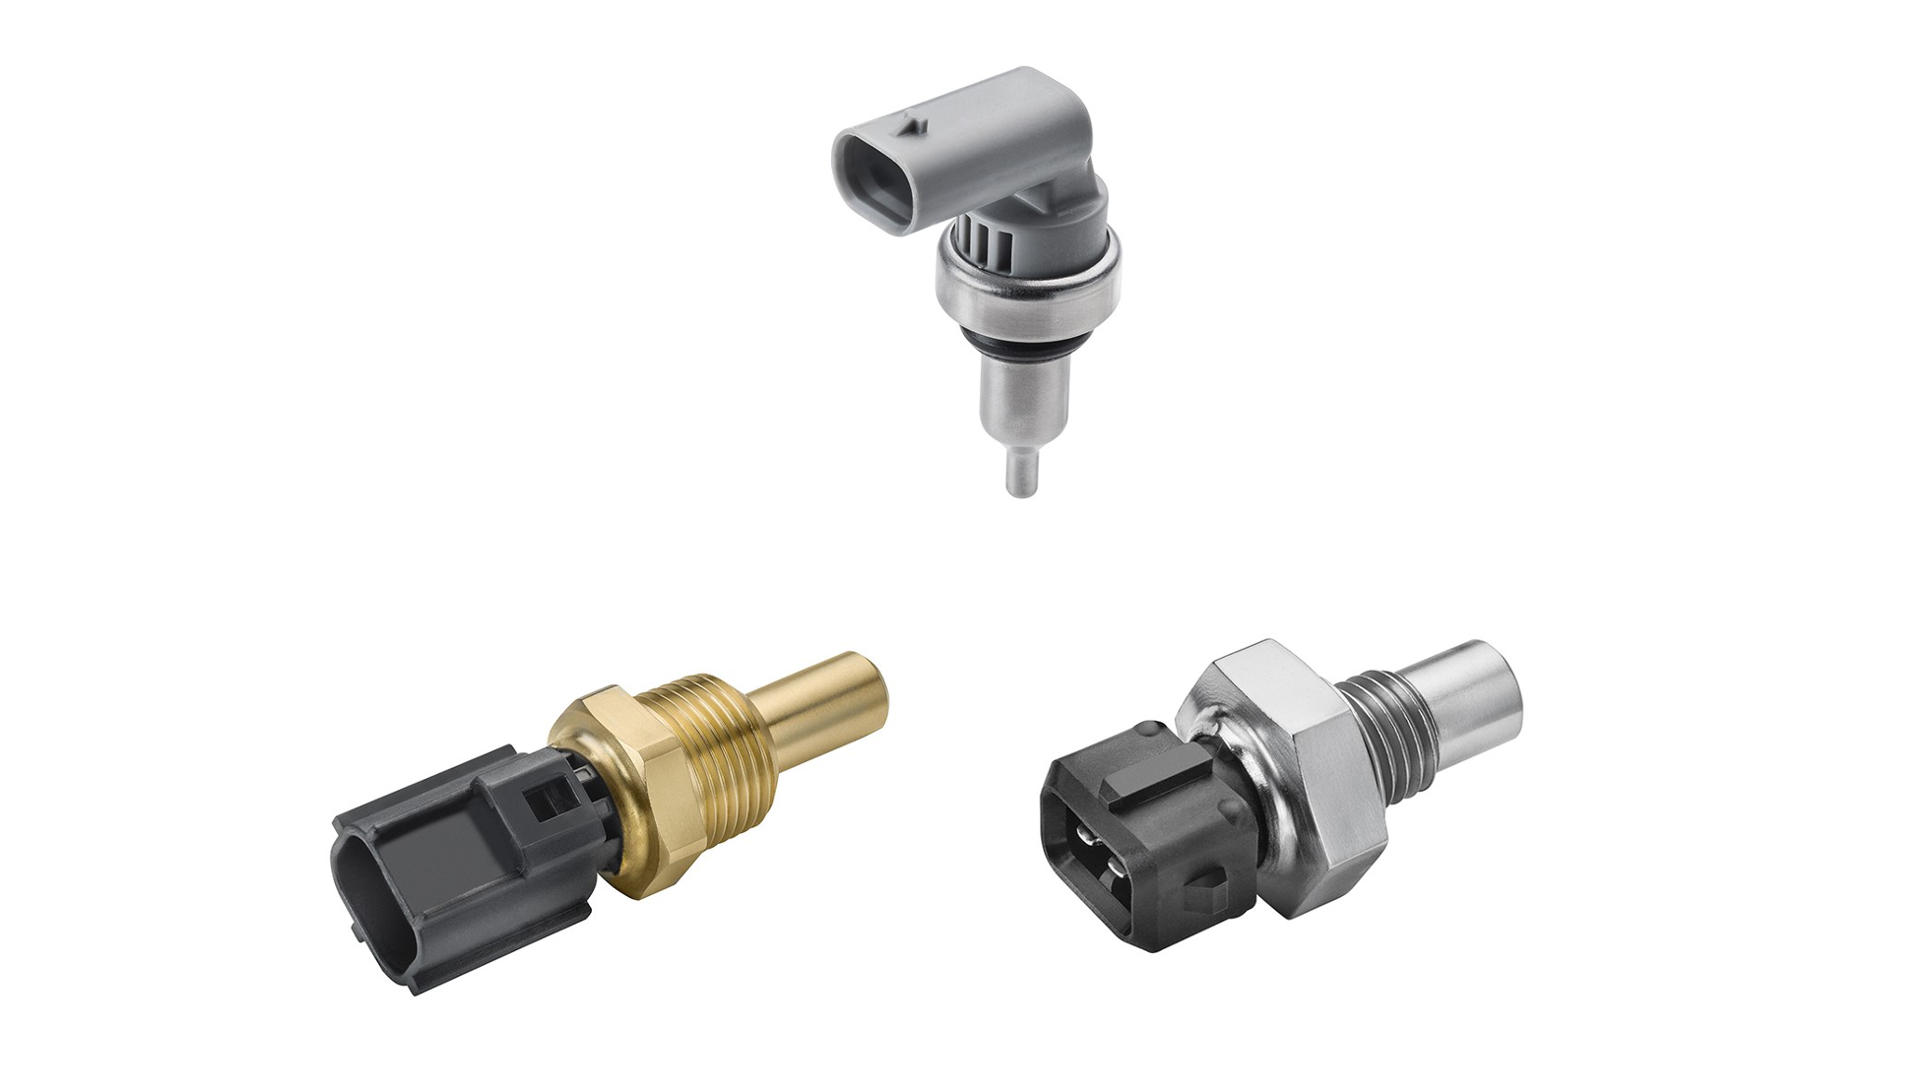
The fuel gauge relies on a fuel level sensor to measure the amount of fuel in the tank. This sensor is often a part of the fuel pump module, located within the gas tank. The sensor uses a float mechanism that moves with the fuel level. As the fuel level changes, the float also adjusts, sending corresponding signals to the vehicle’s electronic system.
Generally, this sensor operates using variable electrical resistance. As the fuel level rises or falls, the resistance in the sensor changes. This change in resistance is interpreted by the vehicle’s computer system, which then translates it into the fuel level display on the dashboard. The sensor’s accuracy is crucial for the gauge to provide a precise reading of the fuel level. If the sensor malfunctions or encounters issues, it can lead to inaccurate readings or a non-functional fuel gauge.
How can the fuel gauge be reset?
The process of resetting a fuel gauge, which indicates the level of fuel in a vehicle’s gas tank, is a common query among car owners. Understanding how this essential component operates and the potential methods for resetting it is crucial for resolving inaccuracies or malfunctions. Resetting the fuel gauge often involves manipulating the vehicle’s electrical system, particularly by disconnecting and reconnecting the battery, but the effectiveness of this method may vary depending on the underlying issue.
Understanding the Fuel Gauge
A fuel gauge serves as a crucial instrument for drivers to monitor the quantity of fuel available in the gas tank. Typically located on the dashboard, it provides a visual representation of the fuel level, allowing drivers to plan their refueling stops effectively. The accuracy of the gauge depends on a complex interplay of components, with the primary role played by the fuel level sensor.
The Role of the Fuel Level Sensor
The fuel level sensor is an integral part of the fuel system, usually housed within the fuel pump module located inside the gas tank. This sensor consists of a float mechanism that moves with the fluctuation of fuel levels. As the fuel level changes, the float adjusts, generating corresponding electrical signals.
Operating via variable electrical resistance, the fuel level sensor’s resistance changes in response to the fuel level’s variations. This fluctuation in resistance is interpreted by the vehicle’s electronic control system, which in turn communicates the fuel level data to the gauge on the dashboard. Any discrepancy or malfunction in this sensor can lead to inaccurate readings on the fuel gauge, potentially necessitating a reset or replacement.
Resetting the Fuel Gauge
One commonly suggested method to reset the fuel gauge involves disconnecting and then reconnecting the vehicle’s battery. This process aims to reboot the car’s electrical systems, including the gauge. Before attempting this, it’s crucial to ensure the car is turned off and the ignition key is removed to prevent any potential electrical mishaps.
However, it’s important to note that while this method can resolve minor electrical glitches in some vehicles, it might not effectively address more complex issues with the fuel gauge or the fuel level sensor. In some cases, a reset might momentarily resolve inaccuracies, but persistent issues may indicate a deeper underlying problem that requires professional diagnosis and repair.
When Resetting Isn’t Enough
If resetting the fuel gauge through the battery disconnect method fails to rectify inaccuracies or if the gauge continues to malfunction, it could be an indicator of a faulty sensor or a more significant electrical issue within the vehicle. In such cases, seeking the expertise of an experienced mechanic becomes imperative.
A malfunctioning fuel level sensor might necessitate replacement, usually conducted by a professional due to its location within the fuel tank and the technical expertise required. Replacing this sensor or addressing larger electrical system issues might result in a higher repair cost, particularly if the fuel gauge is intricately connected to the vehicle’s main electronic system.
Also Read: How to Check Fuel Pressure with OBD2: Step-by-Step Guide
How do you fix an inaccurate fuel gauge?
Addressing an inaccurate fuel gauge is crucial to ensure accurate monitoring of your vehicle’s fuel levels. When faced with this issue, several steps can be taken to rectify inaccuracies and ensure the gauge functions correctly:
-
Check for Potential Interference
Start by examining potential external interferences that might affect the gauge’s accuracy. Ensure the vehicle is parked on a level surface, as an inclined position could affect the readings. Additionally, check for any obstructions or damages around the fuel tank area that might impact the sensor’s functionality.
-
Assess the Fuel Level
Manually check the fuel level by using a dipstick or another measuring tool to verify the accuracy of the gauge’s readings. Compare the actual fuel level to what the gauge displays. If there’s a noticeable discrepancy, it might indicate an issue with the gauge or the fuel level sensor.
-
Attempt a Battery Disconnect Reset
One common troubleshooting method involves disconnecting and then reconnecting the vehicle’s battery. Ensure the car is turned off and the key is removed before disconnecting the battery. This process aims to reset the electrical systems, including the fuel gauge. However, be aware that while this might resolve minor issues, it may not fix more complex problems with the gauge or sensor.
-
Seek Professional Diagnosis
If the inaccurate readings persist after attempting a reset, it’s advisable to seek professional assistance. A mechanic or automotive technician can perform a diagnostic check to identify the root cause of the issue. They have the expertise and tools to conduct a thorough examination of the fuel gauge, sensor, and the vehicle’s electrical systems.
-
Sensor and System Check-Up
The mechanic will likely inspect the fuel level sensor and its connections to identify any faults or malfunctions. If the sensor is faulty or damaged, it might require replacement. Additionally, they will assess the vehicle’s electronic systems to detect any broader electrical issues that might be impacting the gauge’s accuracy.
-
Replacement and Repair
In cases where the fuel gauge inaccuracies persist due to a malfunctioning sensor or other electrical issues, the mechanic might recommend sensor replacement or system repairs. Replacement of the sensor usually requires professional expertise due to its location within the fuel tank and the intricacies involved in the installation process.
-
Cost Consideration
Keep in mind that replacing a fuel level sensor or addressing larger electrical system issues might result in a higher repair cost, particularly if the gauge is part of the main electronic system of the vehicle. Be prepared for potential expenses associated with sensor replacement or extensive electrical repairs.
How to Replace the Fuel Sender Unit?
Step-by-Step Guide:
Step 1: Prepare the Vehicle
Start by ensuring the vehicle is parked in a safe and well-ventilated area. Turn off the engine, and disconnect the car battery to prevent electrical mishaps during the replacement process.
Step 2: Locate the Fuel Sender Unit
Access the fuel tank by either removing the rear seat or accessing it from under the vehicle, depending on your car’s make and model. Locate the fuel sender unit, usually situated on top of or inside the fuel tank.
Step 3: Disconnect Electrical and Fuel Lines
Before removing the sender unit, disconnect the electrical wires and fuel lines connected to it. Take precautions and follow safety guidelines while handling fuel lines to prevent spillage or accidents.
Step 4: Remove the Old Sender Unit
Unscrew or unbolt the sender unit from the fuel tank carefully. Take note of the unit’s position and how it’s installed, as this will help during the installation of the new unit.
Step 5: Install the New Sender Unit
Place the new sender unit in the same position as the old one. Secure it properly by screwing or bolting it in place. Reconnect the electrical wires and fuel lines, ensuring a snug and secure connection.
Step 6: Reconnect the Car Battery
After successfully replacing the sender unit, reconnect the car battery. This step is crucial to restore power and check the functionality of the new unit.
Step 7: Test the System
Turn on the vehicle and observe the fuel gauge to ensure it accurately reflects the fuel level. Listen for any unusual sounds or leaks, which might indicate improper installation or connection issues.
Step 8: Final Check and Adjustment
Double-check all connections and confirm there are no issues. Adjust and reassemble any components that were removed to access the sender unit, ensuring everything is securely in place.
How Do You Calibrate a Fuel Gauge?

Step-by-Step Guide:
Step 1: Check the Manual
Refer to your vehicle’s manual or technical documentation to understand the specific calibration process recommended by the manufacturer. Different models might have varying calibration methods.
Step 2: Access the Instrument Cluster
Gain access to the instrument cluster or dashboard where the fuel gauge is displayed. This might involve removing specific panels or components to reach the gauge.
Step 3: Access Calibration Mode (if applicable)
Some modern vehicles have a calibration mode that allows adjustments to the fuel gauge. Follow the instructions in the manual to access this mode, which may involve pressing specific buttons or a sequence on the dashboard.
Step 4: Calibration Adjustment
Once in the calibration mode, follow the instructions provided in the manual to adjust the fuel gauge. This usually involves manipulating settings to match the actual fuel level with the gauge reading.
Step 5: Manual Calibration (if applicable)
If there’s no calibration mode, some older vehicles might require manual adjustments. In this case, the gauge might need to be recalibrated by physically adjusting components or settings behind the instrument cluster.
Step 6: Test the Calibration
After making adjustments, start the vehicle and observe the fuel gauge. Ensure it accurately reflects the changes made during the calibration process.
Step 7: Fine-Tuning and Recheck
If needed, perform fine-tuning adjustments until the fuel gauge accurately represents the fuel level. Check for consistency and accuracy before completing the calibration process.
Step 8: Reassemble and Test
Reassemble any removed components and test the gauge’s accuracy again to confirm the calibration has been successful.
How Do I Know If My Fuel Gauge Is Accurate?
Visual Observation
- Consistency with Fuel Level
When filling up the tank, observe whether the fuel gauge needle rises consistently and accurately to the full mark. As you use fuel, monitor if the gauge steadily decreases in line with the distance traveled and actual fuel consumption.
- Sudden Fluctuations
Watch for abrupt changes in the fuel gauge unrelated to fuel usage. For instance, sudden drops or rises in the gauge without corresponding changes in driving conditions or refueling could indicate an inaccurate gauge.
- Consistency Across Refills
Check the gauge’s accuracy over multiple refills. A consistently accurate gauge will display a similar fuel level each time the tank is refilled to the same point.
Verifying Fuel Levels
- Manual Measurement
Use a dipstick or measuring tool to manually verify the fuel level against the gauge reading. This method allows you to cross-verify the gauge’s accuracy with the actual amount of fuel in the tank.
- Fuel Level Warning Lights
Some vehicles have warning lights that illuminate when the fuel level is critically low. If these lights do not correspond with the gauge reading or activate at unexpected levels, it could indicate an inaccurate gauge.
- Drive Testing
Compare the indicated fuel levels with the distance traveled. If the gauge consistently shows the same level at various mileage points, it might suggest inaccuracies.
What Causes the Fuel Gauge to Be Incorrect?
Sensor and Electrical Issues
- Faulty Fuel Level Sensor
A common cause of inaccurate readings is a malfunctioning fuel level sensor. This sensor, often located within the fuel tank, sends signals to the gauge based on the fuel level. Sensor malfunctions, such as a stuck float or electrical issues, can lead to incorrect readings.
- Wiring or Connection Problems
Issues with the electrical connections between the sensor and the gauge can disrupt accurate signal transmission. Corroded wires, loose connections, or damaged components can affect the gauge’s functionality.
Mechanical Factors
- Stuck or Faulty Gauge Mechanism
Mechanical faults within the gauge itself can lead to inaccuracies. Factors like a jammed needle, a faulty stepper motor, or damaged components within the gauge assembly can result in incorrect readings.
- Calibration Problems
Sometimes, incorrect calibration of the gauge during manufacturing or after repairs can lead to inaccurate readings. Calibration issues might cause the gauge to display incorrect levels relative to the actual fuel in the tank.
Environmental and Usage Factors
- Inclination and Slope
Parking on an inclined surface can temporarily affect the gauge’s accuracy. The fuel may shift within the tank, momentarily misleading the sensor and gauge.
- Vibration and Impact
Vibrations or impacts to the vehicle, especially around the fuel tank, can potentially damage the sensor or the gauge mechanism, leading to inaccurate readings.
How do I know if my fuel gauge is accurate?
Driving with a broken fuel gauge is possible, but it requires certain precautions, awareness, and additional diligence to avoid running out of fuel unexpectedly.
The fuel gauge serves as a crucial indicator of the remaining fuel in the gas tank, providing drivers with information essential for planning refueling stops.
When the fuel gauge malfunctions or breaks, drivers must employ alternative methods to estimate fuel levels and ensure a safe and uninterrupted journey.
Precautions and Strategies
- Monitor Mileage
Tracking mileage becomes pivotal when the fuel gauge is non-functional. Keeping a record of the distance covered since the last refuel enables an estimate of fuel consumption. However, this method’s accuracy varies depending on driving conditions, the vehicle’s fuel efficiency, and potential changes in driving habits.
- Use Trip Meter
Resetting the trip meter upon refueling allows you to track the distance traveled since the last fill-up. By understanding the average distance covered on a full tank, you can estimate when it might be time for the next refueling.
- Manual Monitoring
Physically checking the fuel levels by using a dipstick or other measuring tool can offer a more accurate assessment of the remaining fuel. This method, while reliable, involves directly accessing the tank and might not be practical for all vehicles.
- Observing Fuel Warning Lights
Most vehicles are equipped with low-fuel warning lights or indicators that illuminate when the fuel level is critically low. Reliance on these lights becomes more critical when the gauge is broken. However, some vehicles might lack this feature.
- Regular Refueling
To prevent running out of fuel, more frequent refueling becomes necessary. Predicting when to refuel by setting a predetermined distance or time interval between refills can mitigate the risk of unexpectedly running out of gas.
Risks and Considerations
- Running Out of Fuel
The primary risk of driving with a broken fuel gauge is the potential to run out of fuel unexpectedly. This situation can be inconvenient, and unsafe, and lead to additional complications, especially if stranded in an unfamiliar or unsafe location.
- Engine Damage
Running a vehicle on an empty tank can cause damage to the fuel pump. A fuel pump relies on the fuel to keep it cool and lubricated, and operating without fuel might lead to overheating or premature wear and tear.
- Safety Concerns
Being stranded due to an empty tank poses safety risks, especially if it happens in isolated or hazardous areas. It can also be problematic during adverse weather conditions or late hours.
How much does it cost to replace a fuel gauge sensor?
The cost to replace a fuel gauge sensor can vary significantly based on several factors, including the vehicle’s make and model, the location of the sensor, and the type of sensor needed. Typically, the price range for replacing a fuel gauge sensor, including parts and labor, can be anywhere from $100 to $800 or more.
Factors Affecting the Cost
- Vehicle Make and Model
Different vehicles have varying complexities in their fuel system design. Replacing the sensor in some vehicles might be more straightforward, while in others, it could require more labor-intensive work.
- Type of Sensor
Fuel gauge sensors come in different types and qualities. OEM (Original Equipment Manufacturer) sensors might be more expensive than aftermarket options. The price might vary based on the quality and brand of the sensor chosen for replacement.
- Labor Costs
Labor charges can significantly impact the overall cost of replacing a fuel gauge sensor. Labor costs vary based on the mechanic’s hourly rate and the amount of time needed for installation. The location of the sensor within the vehicle can affect the complexity of the job and, consequently, the labor cost.
- Additional Repairs
Sometimes, issues with the fuel gauge might not solely stem from a faulty sensor. If there are underlying electrical problems, damaged wiring, or issues with the gauge itself, additional repairs might be necessary, adding to the overall cost.
Average Price Estimates
- Low-End Estimate
For simpler replacements or less expensive aftermarket sensors, the cost might be around $100 to $300.
- Mid-Range Estimate
For most average vehicles and OEM parts, the cost typically falls between $300 to $500.
- High-End Estimate
For more complex replacements, luxury or specialized vehicles, or situations where extensive labor is required, the cost could exceed $500 to $800 or more.
How long does it take to replace a fuel level sensor?
The time required to replace a fuel level sensor can vary depending on several factors, including the specific vehicle, the sensor’s location, and any associated complications that might arise during the replacement process. On average, the replacement procedure can take anywhere from 1 to 3 hours.
Factors Affecting Replacement Time
- Vehicle Make and Model
Different vehicles have distinct designs and varying levels of accessibility to the fuel level sensor. Some vehicles might have the sensor located in a more accessible area, making the replacement process quicker, while others may have the sensor in a more challenging or labor-intensive location.
- Sensor Location
The fuel level sensor is often located within the fuel tank. Accessing the sensor might require the removal of parts or panels, which can impact the time needed for replacement. Some vehicles might have sensors accessible without extensive disassembly, while others might require more effort.
- Mechanic’s Expertise
The experience and familiarity of the mechanic performing the replacement play a significant role. A skilled and experienced technician might complete the job more efficiently compared to someone less experienced.
- Associated Repairs or Complications
If there are additional issues or complications found during the replacement process, such as corroded parts, damaged wiring, or unexpected challenges, it could prolong the time needed for the replacement.
Average Time Estimates
- Simple Replacements
For straightforward sensor replacements inaccessible locations, the process might take around 1 to 2 hours.
- Average Replacements
For most standard vehicles requiring moderate disassembly or accessing the fuel tank, the replacement might take between 2 to 3 hours.
- Complex Replacements
More intricate or challenging replacements, possibly involving extensive disassembly or labor-intensive procedures, might take longer, exceeding 3 hours.
Before the replacement, consulting with a mechanic or automotive technician is advisable. They can provide an estimate based on your specific vehicle and any additional issues that might impact the replacement process, offering a clearer understanding of the time required for the sensor replacement.
FAQs – Will Disconnecting Battery Reset Fuel Gauge?
How do I reset my fuel gauge sensor?
Resetting a fuel gauge sensor often involves disconnecting and reconnecting the car’s battery. This action aims to reset the vehicle’s electronic systems, which can sometimes resolve minor issues related to the fuel gauge sensor.
What does disconnecting the battery reset?
Disconnecting the battery can reset various electronic systems in the car, including the ECU (Engine Control Unit), radio presets, clock settings, and some sensor data. However, the effectiveness of this method varies and might not resolve all issues.
What can cause a faulty fuel gauge?
A faulty fuel gauge can be caused by a malfunctioning fuel level sensor, electrical wiring issues, a stuck or faulty gauge mechanism, calibration problems, or environmental factors such as parking on an incline.
Why is my fuel gauge stuck on empty?
A fuel gauge stuck on empty might be due to a malfunctioning fuel level sensor, damaged wiring, a faulty gauge mechanism, or issues with the sensor’s calibration.
How do you know if your fuel level sensor is bad?
Signs of a bad fuel level sensor include erratic or inaccurate fuel gauge readings, the gauge staying on empty or full despite refueling, or a fuel warning light turning on despite a full tank.
What sensor controls the fuel gauge?
The fuel level sensor, typically located within the fuel tank, controls the fuel gauge. It sends signals to the gauge based on the fuel level, using changes in electrical resistance to relay this information.
How long does it take for ECU to reset after disconnecting the battery?
The time needed for the ECU to reset after battery disconnection can vary. Typically, allowing the vehicle to stand for around 15-30 minutes after disconnecting the battery might reset the ECU. However, in some cases, it might take longer.
Will disconnecting car battery reset everything?
Disconnecting the car battery resets various electronic systems, but it might not reset all settings or issues within the car. Some settings or error codes might persist after the reset.
Do you have to reset anything after changing the battery?
After changing the battery, certain settings, such as radio presets, clock settings, and some sensor data, might need to be reconfigured. It’s also advisable to perform an ECU reset for some vehicles.
How long do you have to leave the battery off to reset your car?
Leaving the battery disconnected for around 15-30 minutes might be sufficient to reset the car’s systems, though the exact duration can vary based on the vehicle.
Will disconnecting the battery reset the check engine light?
Disconnecting the battery might reset the check engine light temporarily. However, if the underlying issue causing the light to illuminate remains unresolved, the light might come back on after a while.
What happens if you disconnect the battery while the car is still running?
Disconnecting the battery while the car is running can cause electrical issues, potentially damaging the vehicle’s electrical system and components. It’s strongly advised not to disconnect the battery while the car is running.
How do you fix a fuel gauge problem?
Fixing a fuel gauge problem involves diagnosing the issue, which might include repairing or replacing the fuel level sensor, addressing wiring problems, calibrating the gauge, or seeking professional assistance from a mechanic.
How do you test a fuel level sensor?
Testing a fuel level sensor typically involves using a multimeter to measure its electrical resistance at different fuel levels. Additionally, checking for voltage changes at the sensor’s wiring can help determine its functionality.
Where is the fuel gauge resistor located?
The fuel gauge resistor is often located within the fuel tank, integrated as part of the fuel level sensor or the fuel pump module, depending on the vehicle’s design.
Conclusion
A functional and accurate fuel gauge is vital for drivers to monitor fuel levels, ensuring safe and efficient journeys. When faced with inaccuracies or a malfunctioning fuel gauge, a series of diagnostic steps and precautions become essential.
Resetting the gauge by disconnecting and reconnecting the car’s battery is a common troubleshooting method, but its effectiveness may vary. Additionally, the replacement of a faulty fuel level sensor may be required, with costs contingent on factors like the vehicle model and sensor type.
Regular maintenance, timely repairs, and careful monitoring contribute to maintaining a reliable and precise fuel gauge, a crucial component for any driver’s peace of mind. Meters and manual fuel level checks can aid in estimating fuel levels when the gauge fails.
Consulting a mechanic for timely repairs and regular maintenance remains essential for safe and reliable driving experiences, ensuring accurate fuel level monitoring and preventing unexpected disruptions on the road.