Addressing the P0113 trouble code in Dodge vehicles involves resolving high input issues related to the Intake Air Temperature Sensor 1 circuit. When this code triggers, it typically indicates a problem with the sensor’s circuit, signaling excessively high input to the vehicle’s engine control module. Resolving this error involves a diagnostic process to pinpoint potential wiring faults, sensor malfunctions, or connector issues. By identifying and rectifying the root cause, such as sensor replacement, circuit repairs, or addressing wiring problems, the vehicle’s performance and fuel efficiency can be restored to optimal levels, ensuring smoother operation and potentially preventing further engine complications.
What Causes A P0113 Dodge Code?
Enter the world of diagnostic codes! P0113 is like your engine’s very own message in a bottle, pointing fingers at the intake air temperature (IAT) sensor. This little hero measures incoming air temps, whispering secrets to the powertrain control module (PCM). But when its whispers turn to shouts or go silent, get ready for a rocky road ahead—think poor fuel mileage, shaky idling, and unwanted pit stops.
The chief troublemaker? Often a rogue IAT sensor, battered or dancing in corrosion. But hold on, it might not be alone in this escapade! Blame misfits like an improperly installed sensor, misbehaving wiring, or even intruders in the intake system.
Ready to solve this car conundrum? Suit up with safety gear and diagnostic gadgets, or summon a savvy technician for a smooth ride. Psst, this code isn’t a solo artist; meet its cousin, the P0113 error in a Jeep! 🚙💨
Diagnosing and Resolving the P0113 Dodge Code: A Step-by-Step Guide
Diagnosing the Issue:
- Identify Potential Causes: The P0113 Dodge code can stem from faulty wiring, compromised connectors, an open IAT sensor circuit, or a failed IAT sensor.
- Use an OBD-II Scanner(buy one from the below link): Access your vehicle’s computer system to read stored trouble codes. This step is crucial to pinpoint the specific issue triggering the P0113 code.
Repair Process:
- Address IAT Sensor Circuit Issues: Start with repairing any open circuits, faulty wiring, or compromised connectors associated with the IAT sensor circuit. This step takes priority before moving to other repairs in the vehicle’s computer system.
- Replacing the IAT Sensor: If the diagnosis reveals a failed IAT sensor, acquire a new one from a trusted automotive parts store or a reputable online retailer specializing in auto parts.
System Reset and Verification:
- Resetting the Computer System: Post-repairs, reset your vehicle’s computer system. Disconnect the battery for at least 30 minutes to clear stored trouble codes from its memory banks.
- Check for Resolution: Reconnect the battery and start the engine. Verify if the P0113 Dodge code has been successfully resolved.
Remember, precision is crucial during this process. Take your time and follow each step meticulously. If unsure or encountering complexities, seeking guidance from a qualified technician is advisable. Ensuring a thorough diagnosis and repair will lead to a successful resolution of the P0113 Dodge code, restoring your vehicle’s optimal performance.
What Are the Common Symptoms of a P0113 Dodge Code?
The P0113 Dodge code falls under the broad category of generic powertrain codes linked to the vehicle’s intake air temperature (IAT) sensor. This particular code flags an issue with the IAT sensor, signaling an unusually high voltage reading, indicating a malfunction in the sensor’s operation. This malfunction disrupts the accurate measurement of incoming air temperature, impacting the engine’s efficiency. Common symptoms associated with this code can serve as warning signs, prompting timely intervention to rectify the underlying issue.
Key Symptoms of a P0113 Dodge Code
-
Illuminated Check Engine Light
The most apparent and frequently encountered symptom signaling a P0113 Dodge Code is the illumination of the check engine light on the vehicle’s dashboard. The activation of this warning light serves as an indicator of potential issues within the powertrain system, urging prompt attention and diagnostics to pinpoint and resolve the underlying problem.
-
Poor Fuel Economy
A prevalent consequence of the P0113 Dodge Code is poor fuel economy. This arises from incorrect air-to-fuel mixture ratios resulting from erroneous IAT readings. The compromised readings disrupt the balance of the air-to-fuel ratio, impacting the engine’s overall efficiency and leading to increased fuel consumption.
-
Rough Idling and Stalling
Left unaddressed, the P0113 code’s effects can cause rough idling and engine stall. The incorrect air-to-fuel mixture ratios generated by faulty IAT readings disrupt the engine’s smooth operation, leading to unstable idling and even engine stall, impacting the vehicle’s drivability.
-
Engine Misfires
Another significant symptom associated with the P0113 Dodge Code is engine misfires. These misfires occur due to the erroneous air-to-fuel mixture ratios resulting from faulty IAT readings. The inconsistency in the air-to-fuel mixture impacts the combustion process, leading to misfires and hindering the engine’s optimal performance.
The occurrence of these symptoms linked to the P0113 Dodge Code highlights the critical importance of diagnosing and addressing the underlying issue promptly. By addressing the malfunctioning IAT sensor or any related wiring or connector issues, one can rectify these symptoms, restoring the vehicle’s efficiency and smooth operation. Additionally, resolving the P0113 Dodge Code can prevent potential long-term damage to the vehicle’s powertrain system, ensuring prolonged and optimal performance.
Also Read: Cylinder 2 Misfire After Spark Plug Change: Troubleshoot
What Possible Solutions Exist for the P0113 Dodge Code?

The P0113 Dodge code, a diagnostic trouble code (DTC), serves as an alert that there’s an anomaly associated with the intake air temperature (IAT) sensor. It’s triggered when the IAT sensor detects an abnormal temperature—either exceptionally high or low—in the intake air stream. To resolve this issue, exploring various potential solutions becomes crucial.
Potential Solutions for the P0113 Dodge Code
-
Inspecting and Cleaning the IAT Sensor
The initial step in addressing the P0113 code involves a thorough inspection and cleaning of the IAT sensor. Debris or dirt accumulation might hinder its functionality, potentially causing malfunction. Gently cleaning the sensor can often resolve issues related to this code.
-
Replacing a Faulty IAT Sensor
If cleaning fails to rectify the problem, replacing the IAT sensor might become necessary. A malfunction that persists despite cleaning may indicate irreparable damage or sensor failure, necessitating a new, properly functioning unit to restore accurate readings.
-
Checking for Vacuum Leaks
Vacuum leaks can also contribute to triggering the P0113 code. A meticulous inspection for potential vacuum leaks is essential. Addressing these leaks, typically by replacing the intake manifold gasket, can effectively eliminate this issue.
-
Examining Wiring and Connectors
Assessing all wiring and connectors associated with the IAT sensor is crucial. Loose connections or faulty wiring could lead to erroneous sensor readings triggering the P0113 code. Ensuring secure, well-connected wiring is vital in rectifying this issue.
-
Updating Vehicle Software
As a final resort, if all prior solutions prove ineffective, updating the vehicle’s software could resolve the persisting issues related to the P0113 Dodge Code. An updated software version might rectify underlying issues causing the faulty sensor readings.
Each solution presented aims to address a different potential cause of the P0113 Dodge code. As a complex diagnostic code, careful consideration and step-by-step investigation are essential to effectively resolve this issue. Tackling each possibility in a systematic manner can lead to a successful resolution, restoring the vehicle’s optimal performance and accuracy in sensor readings. Seeking professional guidance or assistance can further aid in accurately diagnosing and resolving the P0113 code, ensuring a comprehensive fix and preventing potential future occurrences.
How Can You Prevent Future Instances of a P0113 Dodge Code?
Preventing the reappearance of a P0113 Dodge Code necessitates ensuring the optimal condition of the intake air temperature (IAT) sensor and its associated wiring. The IAT sensor, crucial in measuring incoming air temperature for the engine, transmits this data to the vehicle’s computer. Any malfunction or issue with the sensor or its wiring can trigger a P0113 code, signaling an abnormality in the sensor’s operation.
Key Steps to Prevent Future Occurrences
-
Comprehensive Inspection
Begin by meticulously examining all elements related to the IAT sensor for any signs of damage or corrosion. Identifying any such issues is critical, necessitating the immediate replacement of affected parts to ensure proper functionality. Moreover, ensure that all connections remain secure, devoid of dirt, and free from any debris.
-
Electrical Continuity Testing
In cases where no visible physical damage is evident, conduct an electrical continuity test using a digital multimeter. Test for continuity between each wire connected to the IAT sensor and their corresponding terminals on both ends of each wire harness connection point. Lack of continuity signals potential issues, requiring the replacement of any damaged wires. After this, reset the vehicle’s computer system by disconnecting its battery cables for at least 10 minutes before reconnecting them.
-
Professional Diagnostics
If, despite thorough inspection and testing, the system components appear intact, yet the P0113 code persists after a reset, seeking a professional diagnosis becomes necessary. Engage an experienced technician to delve deeper into potential causes. They can investigate the presence of faulty sensors or underlying issues that might necessitate attention. This step is crucial in preventing future occurrences of the P0113 code in your Dodge vehicle.
By following these steps and ensuring the sensor and its wiring are in prime condition, you can significantly reduce the likelihood of a recurring P0113 code. Thorough inspection, electrical testing, and professional intervention, if necessary, are key measures in preventing future occurrences, and maintaining the optimal performance and reliability of your Dodge vehicle.
Why Should Regular Maintenance be Prioritized and What Benefits Does it Offer?
Prioritizing regular maintenance for any vehicle is not merely a suggestion but a crucial element in ensuring optimal performance, longevity, and safety. From your daily commuter car to heavy-duty trucks, consistent care and attention contribute significantly to the vehicle’s overall well-being. Let’s delve into the multitude of reasons why regular maintenance should be a top priority and the array of benefits it offers.
-
Engine Health and Efficiency
Regular maintenance practices, such as scheduled oil changes, filter replacements, and checking fluid levels, play a pivotal role in preserving the engine’s health. Fresh oil lubricates and cleans the engine components, while clean filters prevent debris from clogging essential systems. These efforts promote efficient engine performance, prevent premature wear, and maintain fuel efficiency.
-
Preventing Costly Repairs
Addressing small issues before they escalate into major problems is a fundamental advantage of regular maintenance. Routine inspections and early detection of potential issues allow for timely repairs, thwarting larger, costlier complications in the long run. Neglecting routine maintenance often leads to minor issues evolving into severe and expensive repairs.
-
Enhanced Safety
Maintaining various vehicle components, including brakes, tires, and steering systems, ensures optimal safety for both the driver and passengers. Regular inspections and replacements guarantee that these critical elements operate as designed, reducing the risk of accidents caused by faulty components.
-
Prolonged Vehicle Lifespan
Regular maintenance significantly contributes to extending the lifespan of your vehicle. Consistent care and attention to essential components help the vehicle perform at its peak for a longer duration. A well-maintained vehicle tends to endure the rigors of daily use far better, ultimately extending its longevity.
-
Maintaining Resale Value
A well-documented maintenance history serves as a testament to your vehicle’s care, which is a significant factor in maintaining its resale value. Prospective buyers often prefer vehicles with comprehensive maintenance records, signifying reliability and care, which directly impacts the vehicle’s resale value.
-
Peace of Mind
Undoubtedly, knowing your vehicle is in top condition due to regular maintenance offers peace of mind. You can confidently hit the road, assured that your vehicle is in prime shape, reducing worries about potential breakdowns or unforeseen issues.
-
Environmental Impact
Regular maintenance promotes a more eco-friendly driving experience. Efficiently running vehicles emit fewer pollutants, contributing positively to the environment. By regularly replacing air filters, maintaining emission control systems, and ensuring proper engine performance, you’re actively reducing your carbon footprint.
Regular maintenance isn’t merely a choice but a necessity for any vehicle owner looking to preserve their vehicle’s performance, value, and safety. Embracing routine care through scheduled inspections, timely repairs, and consistent attention to crucial components ultimately leads to a reliable, efficient, and enduring vehicle. This commitment not only saves time and money but also ensures a safer and more reliable driving experience.
What signs indicate a problem with your vehicle’s Intake Air Temperature Sensor (IAT)?
If your car’s Intake Air Temperature Sensor (IAT) is having problems, you might observe some clear indicators. These could be reduced fuel efficiency, higher emissions, engine misfires or stalling, and a drop in power.
Moreover, your dashboard’s Check Engine Light might turn on. If you notice any of these signs, it’s crucial to promptly have a qualified mechanic inspect your vehicle to check if the IAT sensor is causing the issue.
What are the primary reasons for replacing the IAT sensor in your vehicle?
The replacement of an Intake Air Temperature (IAT) sensor in a vehicle might become necessary due to various common reasons:
-
Sensor Failure
One of the primary causes for IAT sensor replacement is sensor failure. Over time, these sensors can experience degradation or malfunction due to wear and tear, extreme temperature exposure, or internal electrical issues. Sensor failure can lead to inaccurate temperature readings, impacting the engine’s fuel-to-air ratio and overall performance, resulting in reduced fuel efficiency and potential warning lights on the dashboard.
-
Physical Damage
Damage to the IAT sensor is another common reason for replacement. Positioned in the intake manifold or air intake system, the sensor is vulnerable to external elements, debris, or accidental impacts. Physical harm can affect the sensor’s accuracy, causing erratic temperature readings and subsequent engine performance problems. Replacing the damaged sensor is essential to restore accurate readings and optimal engine function.
-
Corrosion or Contamination
Corrosion or contamination of the sensor or its connectors due to environmental factors can lead to inaccurate readings. External elements, moisture, or specific environmental conditions might hinder the sensor’s ability to detect temperature accurately, resulting in incorrect inputs to the engine control module. This can lead to issues with the fuel-to-air mixture, impacting engine performance, and necessitating replacement to maintain correct functioning.
-
Symptoms Indicating Replacement
Incorrect sensor readings can manifest as rough idling, stalling, decreased fuel efficiency, or illuminated warning lights. These symptoms often prompt a professional inspection where diagnosis and subsequent replacement of the IAT sensor may be necessary to rectify the underlying issues.
Regular checks and the prompt replacement of a malfunctioning IAT sensor are crucial for maintaining the vehicle’s smooth operation and overall performance. Seeking guidance from a
qualified mechanic for an accurate diagnosis and replacement is advisable when these symptoms arise, ensuring the vehicle’s reliability and efficient functioning.
Is it advisable to replace or clean your IAT sensor when experiencing issues with it in your vehicle?
When faced with issues concerning the Intake Air Temperature (IAT) sensor in your vehicle, the decision to replace or clean the sensor is crucial. Typically, cleaning the IAT sensor is the initial step, often capable of resolving prevalent issues. Using a specialized cleaner in adherence to the manufacturer’s instructions is recommended. If cleaning fails to rectify the problem, it’s probable that sensor replacement is necessary.
Replacing the IAT sensor demands specialized tools and a proficient understanding of correct installation procedures for optimal functioning. If uncertain about this process, seeking assistance from a qualified mechanic is advisable. Their expertise ensures a safe and efficient diagnosis and repair of any IAT sensor issues, providing a reliable solution. For more detailed insights, refer to our guide on the functionality of a cold air intake system.
What methods can you use to test and troubleshoot an IAT sensor in your vehicle to ensure its proper functionality and performance levels?
Testing and troubleshooting an Intake Air Temperature (IAT) sensor on your vehicle is a critical step in maintaining its optimal functionality and performance. The IAT sensor holds a pivotal role in the vehicle’s operation, as it accurately measures the temperature of the incoming air, subsequently aiding in the regulation of fuel injection, ignition timing, and other crucial engine functions. To ensure your IAT sensor is in top working condition, follow these comprehensive steps:
-
Visual Inspection
Begin the diagnostic process by conducting a visual inspection of the IAT sensor and its associated wiring harness. Look for any visible signs of damage, corrosion, or wear. If you detect any issues, it is essential to replace the damaged components promptly.
-
Resistance Measurement
Connect a digital multimeter to the two-wire connector of the IAT sensor and set it to measure resistance in ohms. Start your vehicle’s engine and allow it to reach its normal operating temperature. Then, take a resistance reading from your multimeter. This reading should align with the manufacturer’s specifications for your specific vehicle model. If it falls outside the acceptable range, it indicates a problem with the IAT sensor, which should be replaced.
-
Individual Wire Testing
Disconnect the multimeter from the two-wire connector of the IAT sensor and connect it individually to each wire, taking readings at various engine operating temperatures, including cold start-up and idle speed. Compare these readings with the manufacturer’s specifications for your vehicle model. If the readings deviate from the acceptable range, it suggests issues with the wiring or connectors associated with the IAT system. Before replacing, repairing, or calibrating the IAT sensor itself, address any faulty wiring or connectors.
-
Comprehensive Electrical Check
To ensure proper electrical continuity throughout the entire IAT system, examine all connections between system components. This includes components like the Engine Control Unit (ECU)/Powertrain Control Module (PCM), wiring harness, intake manifold, throttle body, Mass Air Flow Sensor, and more. If any issues are identified during this examination, they must be resolved before proceeding with further testing and troubleshooting.
Properly testing and troubleshooting the IAT sensor is vital to maintaining your vehicle’s efficient operation. By following these steps, you can identify and address issues promptly, ensuring that your IAT sensor is working within the manufacturer’s specified parameters. If you encounter difficulties during this process, seeking assistance from a qualified technician with expertise in vehicle diagnostics is advisable. This ensures that your vehicle continues to perform at its best and avoids potential issues related to the IAT sensor in the future.
FAQs About P0113 Dodge
What is an IAT sensor 1?
The IAT sensor, or Intake Air Temperature sensor, measures the temperature of incoming air to the engine. It aids in regulating the air/fuel mixture for optimal engine performance. “IAT sensor 1” generally refers to the primary sensor in the intake system.
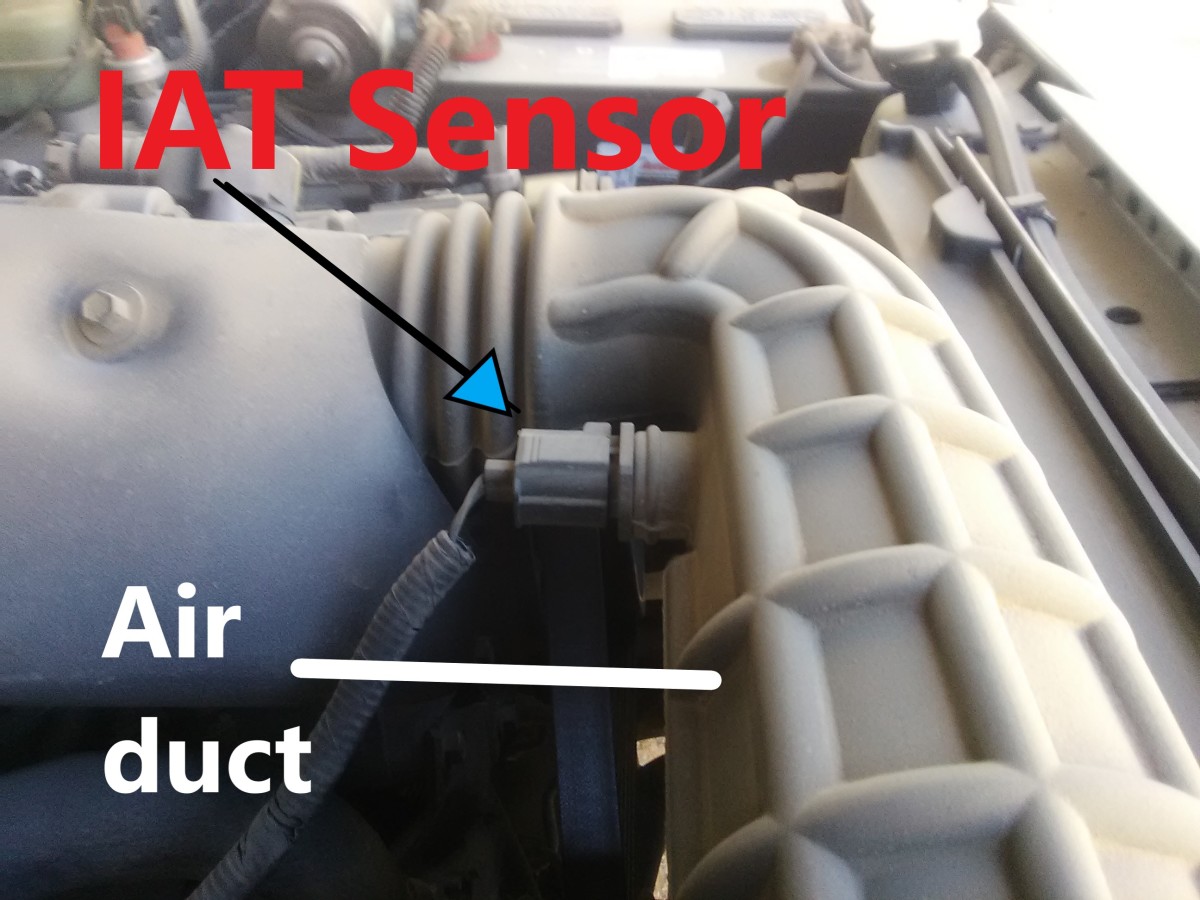
Where is the intake temperature sensor located?
The intake air temperature sensor is typically located near the air intake system, often within the intake manifold or air duct. It can be positioned in the intake tract before the throttle body or near the air filter.
Can P0113 cause the car not to start?
The P0113 code (IAT sensor circuit high input) usually doesn’t directly cause a no-start condition. However, if the engine control module receives a faulty high input from the IAT sensor, it might affect the air/fuel mixture, leading to rough idling, reduced fuel economy, or engine stalling, but it’s rare for it to prevent the car from starting.
Where is the intake air temperature sensor 1 circuit high?
“Intake air temperature sensor 1 circuit high” refers to the first IAT sensor detecting a high voltage input. This issue might be due to a malfunctioning sensor or problems within the wiring or connectors associated with the IAT sensor.
What are the symptoms of a bad intake air temperature sensor?
Symptoms of a faulty IAT sensor include decreased fuel efficiency, rough idling, stalling, reduced engine power, or illuminated check engine light. These issues can arise due to incorrect air/fuel ratios caused by inaccurate temperature readings from the sensor. Regular maintenance and timely sensor checks help avoid these symptoms.
Conclusion
Thoroughly testing and troubleshooting the IAT sensor is crucial for maintaining a vehicle’s optimal performance. By inspecting, testing resistance, evaluating individual wires, and ensuring electrical continuity, potential issues can be identified and resolved. Prompt attention to the IAT sensor’s functionality assures accurate air temperature measurements for engine operations. This proactive approach not only prevents potential malfunctions but also sustains the vehicle’s efficiency. Regular inspection, coupled with swift corrective measures, guarantees a vehicle that operates within precise specifications. In the pursuit of a well-maintained vehicle, proper IAT sensor testing and troubleshooting stand as a cornerstone, ensuring reliable and efficient performance on the road.
![[Solved] Why Does The 2013 Dodge Challenger Window Keep Going Up And Down?](https://carfixexperts.com/wp-content/uploads/2024/03/dgu6i56-9f86f76e-6f59-46bb-8118-483da365e203.jpg)