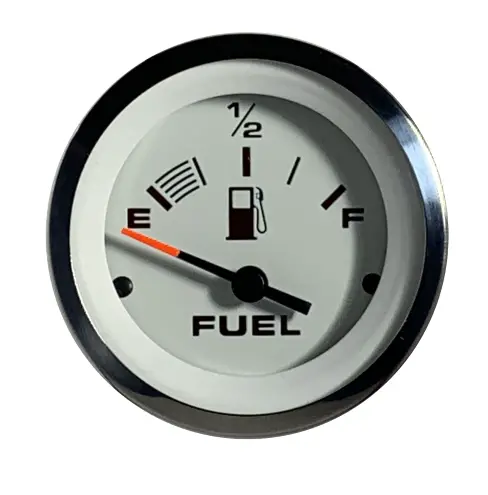
In automobiles, an often-overlooked yet indispensable component takes center stage—the fuel gauge. This unassuming gauge, discreetly positioned on your vehicle’s dashboard, holds the key to your journey’s success. Whether it’s your daily commute or an adventurous road trip, the fuel gauge quietly conveys a critical piece of information: the remaining fuel in your tank.
However, the true value of the fuel gauge often becomes apparent only when it falters. Picture this scenario: you’re cruising down the highway, relishing the open road, when your vehicle suddenly sputters to a halt. Frustration mounts as you inspect your fuel gauge, which inexplicably suggests a sufficient fuel level for your journey’s completion.
Fuel gauge issues like these can swiftly turn a pleasant drive into a frustrating ordeal. This is where comprehending your vehicle’s fuel gauge becomes vital.
In this article, we will unravel the mysteries surrounding the fuel gauge, exploring its pivotal role and addressing common problems such as a malfunctioning or inaccurate fuel gauge. We will answer essential questions, including how cars measure fuel and what precisely a fuel gauge does. Additionally, we will delve into vexing issues like the fuel gauge indicating “empty” when the tank is full or “full” when it’s empty, demystifying their origins and providing practical solutions.
Furthermore, we will equip you with the skills to diagnose fuel gauge problems, offering step-by-step guidance and insights into its inner workings. Whether you’re grappling with a malfunctioning fuel gauge or simply seeking to comprehend its operation, this article will serve as your comprehensive guide.
So, prepare for a journey to uncover the details of the fuel gauge, ensuring you possess the knowledge and tools to maintain your vehicle’s smooth and trouble-free operation.
Understanding the Fuel Gauge
A fuel gauge is a vital component of every vehicle’s instrument panel, serving as a key informant about the fuel levels in your gas tank. Its role is deceptively simple but crucial: to provide you with real-time information on the amount of fuel remaining, ensuring that you can plan your journeys accordingly and avoid inconvenient and potentially stranded situations.
Components of a Fuel Gauge System

To comprehend the inner workings of a fuel gauge, it’s essential to grasp its core components:
- Sending Unit: At the heart of the fuel gauge system lies the sending unit, a device typically located within the gas tank. This unit comprises a float connected to a variable resistor. As the fuel level changes, the float moves, altering the resistance in the circuit.
- Gauge Cluster: Inside your vehicle’s dashboard, the gauge cluster houses the fuel gauge itself. This gauge is connected to the sending unit by wires, forming a crucial electrical circuit.
- Voltage Regulator: The voltage regulator ensures that the electrical current to the fuel gauge remains constant, preventing erratic readings.
How a Fuel Gauge Works
The operation of a fuel gauge is based on a straightforward principle—electrical resistance. Here’s how it works:
- When the fuel tank is full, the float within the sending unit rises to the top. This causes the variable resistor to provide low resistance in the electrical circuit.
- Conversely, when the fuel level decreases, the float descends, increasing the resistance in the circuit.
- The fuel gauge, connected to this circuit, interprets the changing resistance as varying fuel levels and displays this information on your dashboard.
Essentially, a higher resistance indicates a lower fuel level, and vice versa.
How Do Cars Measure Fuel?
Cars measure fuel using a combination of the fuel gauge and the sending unit within the gas tank. As the fuel level changes, the float within the sending unit rises or falls, altering the electrical resistance in the circuit. The fuel gauge, connected to this circuit, interprets the resistance changes and displays them as a visual representation on your dashboard.
Components of a Fuel Gauge
A standard fuel gauge system consists of the sending unit, gauge cluster, and voltage regulator. The sending unit is responsible for sensing the fuel level, the gauge cluster displays this information, and the voltage regulator ensures a consistent electrical current for accurate readings.
Common Fuel Gauge Problems
A malfunctioning fuel gauge can quickly turn a routine drive into a frustrating and potentially risky experience. Here, we’ll delve into some common fuel gauge problems, understand why they occur, and assess their impact on drivers.
-
Fuel Gauge Reading Empty when Tank is Full

This problem is a source of annoyance for many drivers. You’ve just topped up your tank, but your fuel gauge stubbornly remains pegged at “Empty.” Several factors can contribute to this issue:
Causes
- Faulty Sending Unit: The most frequent culprit behind this problem is a defective sending unit. If the float inside the tank is damaged or gets stuck, it can’t provide an accurate reading to the gauge.
- Wiring Issues: Damaged or corroded wires connecting the sending unit to the gauge can disrupt the electrical signal, leading to incorrect readings.
Impact on Drivers
- Drivers might experience anxiety and inconvenience, fearing they will run out of gas when the gauge indicates “Empty” despite having a full tank.
- The risk of driving on an empty tank can result in being stranded, potentially on a busy highway or in an unsafe area.
-
Fuel Gauge Reads Full when Tank is Empty

This issue can be equally exasperating. You’ve just emptied your gas tank, but the gauge insists it’s full. The common reasons for this problem include:
Causes
- Stuck Sending Unit Float: A float that’s stuck at the “full” position, even when the tank is empty, can lead to this issue.
- Wiring or Grounding Problems: Damaged wiring or poor grounding connections can disrupt the electrical circuit, affecting the gauge’s accuracy.
Impact on Drivers
- A fuel gauge displaying “full” when the tank is empty can lead to poor fuel management, resulting in unnecessary refueling stops and potential inconvenience.
- Drivers may fail to monitor their actual fuel levels, leading to the risk of running out of gas unexpectedly.
Implications of a Malfunctioning Fuel Gauge
A malfunctioning fuel gauge poses several implications for drivers:
- Reduced Reliability: Drivers lose confidence in their vehicle’s ability to accurately gauge fuel levels, leading to anxiety and uncertainty on the road.
- Inefficient Fuel Management: When the fuel gauge provides incorrect readings, drivers may either refuel prematurely, wasting money and time or run the risk of driving with insufficient fuel.
- Safety Concerns: Ignoring the problem or neglecting to address it can result in potentially hazardous situations, such as running out of fuel on a busy road.
Why is My Fuel Gauge Empty when I Get Full?
The fuel gauge displaying “empty” when the tank is full often stems from a malfunctioning sending unit, damaged wiring, or grounding problems. These issues disrupt the electrical circuit and prevent the accurate reading of fuel levels. To avoid this frustration and potential inconvenience, it’s crucial to address and resolve fuel gauge problems promptly. In the following sections, we’ll delve into diagnosing and fixing these issues, allowing you to drive with confidence and peace of mind.
Diagnosing Fuel Gauge Problems

A malfunctioning fuel gauge can be a significant inconvenience, but diagnosing the issue is the first step toward a solution.
Step-by-Step Diagnosis of Fuel Gauge Problems
- Check the Fuel Gauge Fuse: Start by inspecting the fuse associated with the fuel gauge. A blown fuse can lead to a non-functional gauge. Consult your vehicle’s manual to locate the fuse box and identify the appropriate fuse.
- Verify the Wiring: Ensure that the wiring connecting the fuel gauge to the sending unit is intact and not damaged or corroded. Damaged wires can disrupt the electrical signal, leading to inaccurate readings.
- Test the Voltage: Use a multimeter to test the voltage at the gauge and the sending unit. Compare the readings to ensure there’s a consistent voltage supply. If there’s a significant voltage drop, it could indicate a wiring or grounding issue.
Testing the Fuel Gauge Sending Unit
- Locate the Sending Unit: The fuel gauge sending unit is typically inside the gas tank. You may need to remove the tank or access it through an inspection plate, depending on your vehicle’s design.
- Inspect the Float: Examine the float for any damage or obstructions that might prevent it from moving freely. Ensure that the float arm is not bent or stuck.
- Measure Resistance: With the sending unit exposed, use a multimeter to measure the resistance across the variable resistor in the sending unit. As the float moves, the resistance should change smoothly. If it doesn’t, the sending unit is likely faulty and needs replacement.
- Check Wiring Connections: Inspect the wiring connections at the sending unit for corrosion or loose connections. Clean or tighten them as necessary.
Reading and Interpreting Fuel Gauge Readings Accurately

- Fill the Tank: Start with a full tank of fuel. This provides a known reference point for your readings.
- Observe the Gauge: As you drive, keep an eye on the fuel gauge. Note how it responds to changes in fuel levels. Be aware that it may not always provide an immediate response to changes in fuel levels due to the design of some sending units.
- Record Mileage: To cross-check your fuel gauge’s accuracy, record your mileage at different fuel levels. For example, note the mileage when the gauge reads half-full, three-quarters full, etc.
- Maintain a Log: Over several fill-ups, maintain a log of the amount of fuel you refuel and the corresponding fuel gauge readings. This log can help you establish a more accurate understanding of your gauge’s behavior.
Testing a Fuel Pressure Regulator Without a Gauge
If you suspect issues with the fuel pressure regulator but you don’t have a fuel pressure gauge, here’s a simple method to test it:
- Locate the Fuel Pressure Regulator: It’s typically connected to the fuel rail on the engine. Refer to your vehicle’s manual for its exact location.
- Remove the Vacuum Hose: The fuel pressure regulator often has a vacuum hose connected to it. Remove this hose carefully.
- Observe Fuel Leakage: Start the engine and let it run. If you observe fuel coming from the vacuum hose port, it indicates a malfunctioning fuel pressure regulator. A functional regulator should not allow fuel to escape.
Also Read: Accelerator Pedal Position Sensor: Maintenance & Diagnosis
Fixing Fuel Gauge Issues
Dealing with a malfunctioning fuel gauge can be frustrating, but the good news is that there are methods to fix common problems.
Methods for Fixing Common Fuel Gauge Problems
- Sending Unit Repair or Replacement: If the problem lies with the sending unit, it may need repair or replacement. In some cases, cleaning or repositioning the float can resolve issues. However, if the unit is damaged, it’s advisable to replace it.
- Wiring Inspection and Repair: Ensure that the wiring connecting the fuel gauge to the sending unit is in good condition. If you find damaged or corroded wires, replace or repair them as necessary.
- Grounding Check: Ensure that the sending unit is adequately grounded. A poor ground connection can affect the gauge’s accuracy. Clean and secure the ground connections if needed.
How to Fix Fuel Gauge Issues
- Step 1: Identify the Problem: Start by diagnosing the specific issue with your fuel gauge. Is it reading inaccurately, stuck, or not working at all? This will guide your troubleshooting.
- Step 2: Check the Fuse: Verify the condition of the fuel gauge fuse. If it’s blown, replace it with a fuse of the correct rating.
- Step 3: Examine the Wiring: Inspect the wiring for any visible damage, corrosion, or loose connections. Repair or replace damaged wiring as required.
- Step 4: Test the Sending Unit: If the issue persists, test the sending unit for resistance changes as the float moves. If it’s faulty, consider replacing it.
- Step 5: Ground Connection: Ensure that the sending unit has a strong ground connection. Clean and secure the ground connection if needed.
- Step 6: Gauge Calibration: In some cases, the fuel gauge may need calibration. Consult your vehicle’s manual for instructions on calibrating the gauge.
Disconnecting the Battery to Reset the Fuel Gauge
Disconnecting the battery can sometimes reset the fuel gauge, but it’s not a guaranteed fix. Here’s how it works:
- Disconnecting the battery resets the vehicle’s computer, including the fuel gauge’s memory. When you reconnect the battery, the gauge may recalibrate itself, which can resolve minor issues.
- This method is most effective for problems related to electrical glitches or temporary sensor issues.
- However, it may not work for more significant issues, such as a damaged sending unit or wiring problems.
Replacing the Fuel Gauge
If all else fails and your fuel gauge problems persist, you may need to consider replacing the gauge. Here are some benefits of replacing the fuel gauge:
- Reliable Fuel Monitoring: A new fuel gauge ensures accurate and reliable fuel level readings, providing peace of mind during your journeys.
- Modern Features: Upgrading to a new gauge can provide modern features such as digital displays and improved precision.
- Resolution of Persistent Issues: If your current gauge has had multiple issues and repairs haven’t been successful, a replacement can provide a fresh start.
How to Reset a Fuel Gauge and How It Works
The fuel gauge can often be reset by disconnecting the vehicle’s battery. As mentioned earlier, this action clears the gauge’s memory and recalibrates it.
In terms of how a fuel gauge works, it relies on a sending unit in the gas tank. The sending unit’s float moves with changes in fuel levels, altering the resistance in an electrical circuit. The gauge interprets these resistance changes to display the fuel level on your dashboard.
Upgrading to Aftermarket Fuel Gauges
Upgrading to aftermarket fuel gauges can bring a range of benefits, offering modern features, enhanced accuracy, and customization options.
Benefits of Aftermarket Fuel Gauges
- Enhanced Precision: Aftermarket fuel gauges often provide more accurate and precise readings, reducing the margin of error in monitoring your fuel levels.
- Customization: Many aftermarket gauges offer customization options, allowing you to choose the gauge face design and lighting to match your vehicle’s interior.
- Modern Features: These gauges can include modern features such as digital displays, which offer clear and easy-to-read fuel level information.
- Additional Information: Some aftermarket gauges can display extra information, like fuel consumption rates, remaining mileage, or even diagnostic information about your vehicle’s fuel system.
- Improved Visibility: Upgraded gauges often come with better backlighting or illumination, making them easier to read in various lighting conditions.
Installation and Wiring of Aftermarket Fuel Gauges
- Select the Gauge: Choose an aftermarket fuel gauge that suits your preferences in terms of design and features.
- Locate a Suitable Location: Find a suitable location on your dashboard to install the new gauge. Ensure it’s visible to the driver and easily accessible for wiring.
- Disconnect the Battery: Before any electrical work, disconnect the vehicle’s battery to ensure safety.
- Wiring: Connect the gauge’s power wire to a switched 12V power source, typically from the ignition switch. Connect the ground wire to a clean and secure ground point.
- Connect to the Sending Unit: Attach the wire from the sending unit to the corresponding terminal on the new gauge. This wire is responsible for transmitting fuel level information to the gauge.
- Secure the Gauge: Mount the gauge in its designated location, ensuring it’s secure and properly aligned.
- Connect the Lighting: If your new gauge has backlighting, connect the lighting wires to an appropriate power source, usually the vehicle’s dashboard illumination circuit.
- Reconnect the Battery: Once all wiring is complete, reconnect the vehicle’s battery.
- Test the Gauge: Turn the ignition on and test the gauge to ensure it displays accurate readings.
Universal Fuel Gauges
Universal fuel gauges are designed to fit a wide range of vehicles, making them versatile and widely accessible. They are available in various sizes and styles, simplifying the installation process and ensuring compatibility with many vehicles.
Digital Fuel Gauges and Their Advantages
Digital fuel gauges offer several advantages over traditional analog gauges:
- Precision: Digital gauges provide precise readings, often to the nearest decimal point.
- Clear Readings: The digital display offers clear and easily readable information, even in varying lighting conditions.
- Additional Features: Many digital gauges come with extra features such as low fuel warnings, trip meters, and more.
- Modern Aesthetic: They give your vehicle’s interior a modern and tech-savvy appearance.
- Accuracy: Digital gauges are less prone to inaccuracies associated with mechanical gauges due to wear and tear.
Fuel Sender Fuel Gauge Wiring Diagram

FAQs Of Fuel Gauge
What does a fuel gauge do?
A fuel gauge provides real-time information about the amount of fuel in your vehicle’s gas tank, helping you monitor your fuel levels.
Why is my fuel gauge reading empty when the tank is full?
This issue is often caused by a malfunctioning sending unit, damaged wiring, or a faulty float inside the tank.
How do I test my fuel gauge if it’s not working correctly?
Diagnose the problem by checking the fuse, inspecting the wiring, testing the sending unit, and verifying the ground connections.
Can disconnecting the battery reset the fuel gauge?
Disconnecting the battery can reset the fuel gauge’s memory and recalibrate it. This can resolve minor issues related to electrical glitches or sensor problems.
How do I read and interpret fuel gauge readings accurately?
Read and interpret fuel gauge readings by maintaining a fuel level log, recording mileage at different fuel levels, and calibrating the gauge if necessary.
How do I upgrade to an aftermarket fuel gauge?
Choose an aftermarket gauge, locate a suitable installation location on your dashboard, complete the wiring, and test the gauge for accuracy.
What are the benefits of aftermarket fuel gauges?
Aftermarket fuel gauges offer enhanced precision, customization, modern features, and improved visibility, improving your overall driving experience.
Are there universal fuel gauges available?
Yes, universal fuel gauges are designed to fit a wide range of vehicles, making them versatile and accessible.
What advantages do digital fuel gauges offer?
Digital fuel gauges provide precise readings, clear displays, additional features like fuel consumption data, and a modern aesthetic.
Can I replace my vehicle’s fuel gauge if it’s malfunctioning?
Yes, replacing the fuel gauge is an option. A new gauge ensures accurate readings and can resolve persistent issues related to the fuel gauge’s accuracy and functionality.
Conclusion
In this guide, we’ve explored fuel gauges, from their fundamental role in vehicles to diagnosing and fixing common problems. We’ve also discussed the option of upgrading to aftermarket fuel gauges, providing valuable insights into the benefits and installation process.
A functional fuel gauge is essential for confident and safe driving. Whether through diagnosis, repairs, or upgrading, ensuring your fuel gauge provides accurate readings is key to avoiding inconvenient and potentially hazardous situations on the road. So, keep an eye on that trusty dashboard companion, and may your journeys always be smooth and worry-free.